Thursday, May 30, 2013

Operation Hearth Re-Tile - Making the Cut{s}...

Okay so after all the inspiration, perspiration and trepidation…it was time for the next step in my hearth re-tile project. 


After deciding on the 2" hex pattern and picking up that deliciousness and some supplies from The Tile Shop, it was time to use them!  More specifically, I needed to figure out the placement of the tile, make necessary cuts and dry fit things into place.

***Please excuse me while I panic about what the best way to to approach this is.***

Luckily, my helpful neighbor came to the rescue.  He tackled a tile project or two in the past, and was able to sit with me and map things out.  We had just enough tile for the hearth, with very little to spare…so we had to carefully utilize each and every sheet.  After laying all the tile we had out on the floor, we determined where to make cuts so I wasn’t filling in small gaps around everyyyyy edge of the hearth.  {Whose brilliant idea was it to use hex shaped tile for the first tile job they ever did??  Oh yea, that was me. :-/}

Using a straight edge {old piece of scrap wood}, measuring tape and pencil we marked our cuts on the tile.  And Perny supervised. ;)


We started with the first row of tile that would butt up against the straight edge closest to the fireplace.  We marked the tile so we'd be cutting the triangular tips of the hexagons off to create a flat edge on enough sheets to span the entire width of the hearth.  After that was done, we would then cut sheets to fill in the remaining gap between the sheets and the wood trim.  Once those cuts were done, we would peel individual tiles off of the sheets and make cuts to fill in the spaces along the two short sides of the hearth.

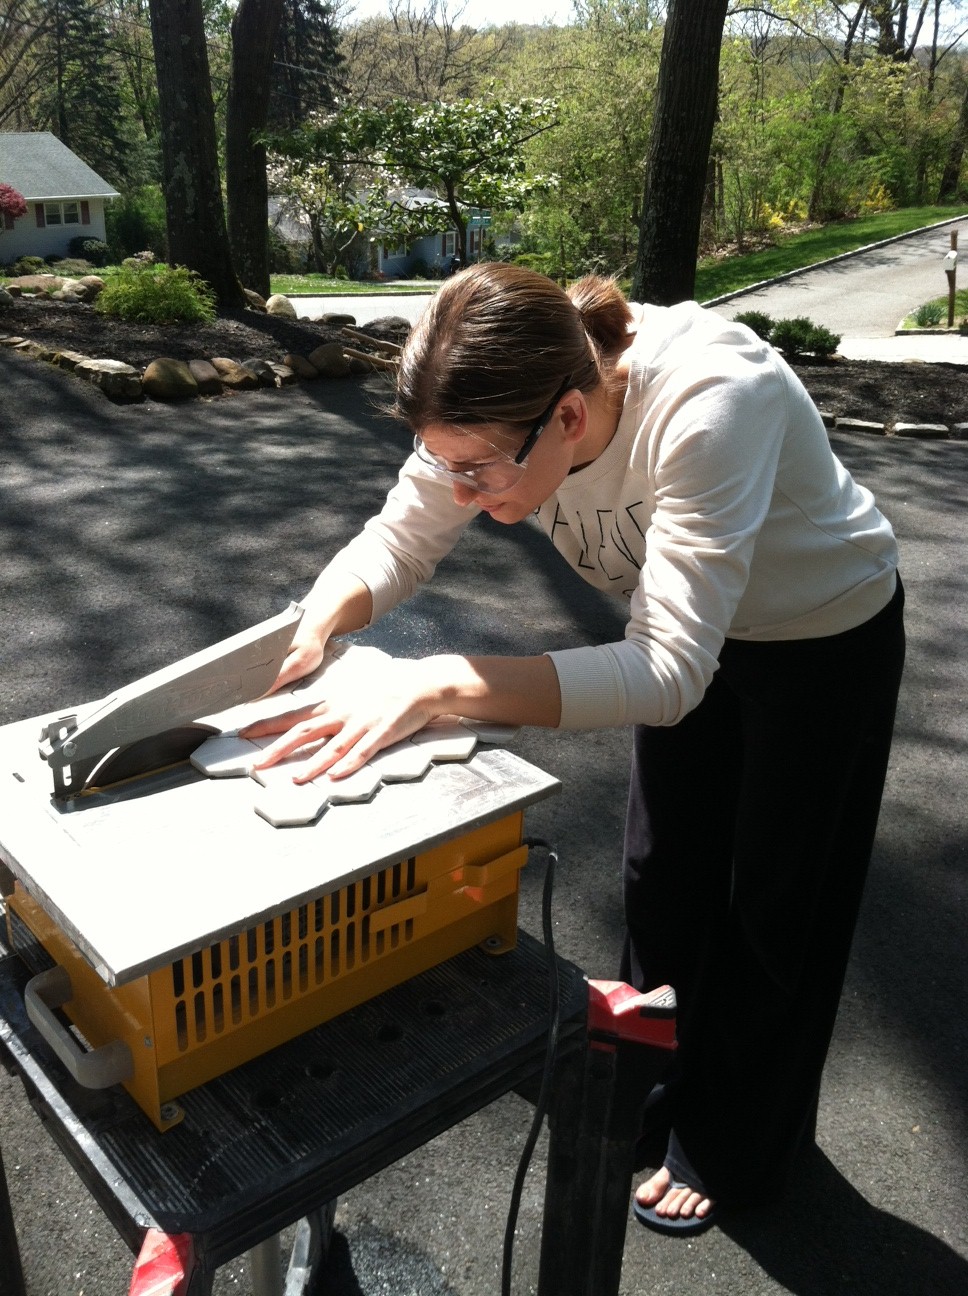
With our plan in place and our first set of marks done {we cut things one row at a time…after cuts were made, we’d bring things inside and do a dry fit to make sure we were on the right track} we headed out to the driveway for the fun/terrifying/panic-inducing task of using the wet saw.  Maybe you think I'm being a little dramatic about using the wet saw, but I'm pretty sure the last time I used a  power saw was in middle school shop class.


My awesome neighbor set the saw up, and then got me rolling.  I was TERRIFIED to make cuts.  Marble isn’t the easiest thing to cut…especially when it comes to taking off small corners of small tiles.  I was sweating.  I’m not sure if I was soaked more from the wet saw or my own nerves.  I. Didn't. Want. To. Chip. My. Fragile. Marble.


After I did the first few sheets, I calmed down a bit.  I was able to get through every single sheet and piece of tile without any chipping or errors.  Sorry for the out-right brag, but I was pretty proud of myself in that moment.  And then even a little more proud when I assured myself that all the pieces fit perfectly into place.


Dry fit complete!!!!

Anyone else give yourself a major pat on the back after completing a new-to-you task?!


***Although I was super, duper lucky to get some free tile and materials for this project from The Tile Shop, this is not a sponsored post.  I've always promised to keep it real with you guys, so I wanted to let you guys know how much they rock! :)***

Tuesday, May 28, 2013

Operation Hearth Re-Tile - Demo Time

After I received all the inspiration I needed from The Tile Shop, I was more than determined to demo the heck out of our old, outdated hearth.


To get things started, I used a hammer and flat head screw driver to pry up the front piece of wood trim that surrounded the hearth.  I slowly, and carefully, worked my way across the piece of wood...focusing my efforts where each nail was shot into the wood.  By prying things up in those areas, I had less of a risk of splitting or cracking the wood.


Once that piece was up, I put it to the side {keeping the nails in place so I could easily hammer the trim back down in the future}.  I could now see that the tiles used were super thin, and the concrete bed they were laid in was almost two inches thick, and the edges of it were crumbling.


To remove the super thick concrete bed, I busted out the crowbar.  I lined the edge the bar up with the bottom of the concrete.  After hammering a few times, I pulled back on the crowbar, and the concrete buckled.  Luckily, the majority of the hearth came out in a few huge chunks.


Once that layer was removed, I was left with a very jagged and uneven bed of concrete. 


It wasn’t exactly a flat or smooth sub-floor to build off of.  At this point, I started questioning things.  Why the heck did I think I could do this project?  How the heck would I smooth things out?  How am I going to build the surface up enough so it’ll be flush with the wood trim again?  I’m. In. Over. My. Head.  Soooo at that point, I went to bed. ;)

After I slept on things, I woke up with renewed confidence I could get it done.  To solve my issue, some people recommended using a self-leveling compound, but it just didn’t seem right to me.  The gap to fill was too big, and we were on the second floor.  If the compound seeped through any cracks {and believe me, there were a ton}, it’d go right through the floor and onto our furnace and hot water heater.  No bueno.  Instead, I turned to Henry’s Floor Patch and Leveler.  This stuff had the right consistency for my needs and was made to bond to concrete.


Following the instructions, I cleaned the concrete so it was free of any dust or debris.  {I also put the front piece of wood trim back on so all sides were the same height.}


Then I worked in sections...dampening the concrete with a sponge and then applying the floor leveler with a trowel.  I went through a few buckets of this stuff, and applied it in several thin layers {over several days}...gradually building up certain areas without piling the product on too thick.  After each application, I left things to dry overnight, and by morning it was always rock solid.


To figure out how high I needed to build up the base of my hearth, I took into account the thickness of my marble tile, plus the thickness of thinset to be used when installing marble mosaic tile.  Of course, I knew I wouldn’t be able to get the hearth perfectly level, but I could account for any inconsistencies by using more or less thinset to keep the tiles flush with each other during installation.

Thankfully, after a couple applications of Henry’s and a ton of patience, the hearth was finally ready for some new tile!


I couldn't believe how long it took me to get to the tiling point of this project, but I was so happy to be there!  I just wanted to get on to the pretty stuff. ;)

Anyone else question their ability halfway through a project?!?!  Did you keep going, or hire a professional?

Monday, May 27, 2013

Modern Masters Giveaway Winner!

Thank you so very much to all of my awesome readers who entered my Modern Masters giveaway! With the help of Rafflecopter and Random.org a lucky winner has been selected...congratulations Jennifer Fadiman!  


a Rafflecopter giveaway

I'll be emailing you soon!

Happy Memorial Day everyone!! :)

Wednesday, May 22, 2013

Operation Hearth Re-Tile - The Tile Shop Inspiration

For those of you who follow me on Instagram, you may remember that over the winter I developed a major itch to demo our old fireplace hearth and replace it with something dreamy {and more our taste} from The Tile Shop.

When we purchased our home, we were sooo excited to have a fireplace, but the finishes of it definitely weren’t our style.


The wood trim got a fresh coat of white, and so did the dingy, dirty red brick.


The brass screen was sprayed painted a brushed silver, and the worn, unattractive red tile was primed and painted a charcoal gray.  {Don't mind the old Christmas decorations...we moved in on Christmas Eve.}


That solution worked for the short-term.  It helped to bring our fireplace into this decade, but then, you know me...I grew tired of the paint chipping up, and I started dreaming of how much better the fireplace could be.  In other words, I got antsy to cross another project off the list.  I decided it was time to try my hand at tiling.  Ahhhh!!

To get some inspiration for the project, I headed to The Tile Shop showroom, which luckily, just opened a few months ago near our house.  I thought I would make a bee-line for the marble tile choices, but I was mistaken.  The minute I stepped in their doors, I was drawn to all the beautiful displays they had set up.  My absolute favoriteeeee was this bathroom.  I loved every. single. thing. about. it.


After lots of unintentional browsing, I was able to remind myself that I was there for our hearth project, not for a bathroom re-do…so I made my way to the marble mosaic tiles.  I think it's safe to say that I am obsessed with marble tile.  The white and grey veining is perfect for our home, and I love that it’s a classic material.  If it's cut into square tiles, it can be traditional....subway tiles, it can be classic...and then there is the hex tile.  Ahhhhh, the hex tile.  Pardon me while I swoon. ;)


I love that in marble, the hex tile is a classic choice, with a modern twist...perfect for the look we wanted to achieve on our hearth!  {And I'm not gonna lie...some subway tile in a herringbone pattern would also be UH-mazing, but the thought of that was a little nerve-wracking for me to take on for my first tile job.  Eeeeek!!  Maybe that'll be the right choice for a backsplash when the time comes. ;)}

Thank you, Tile Shop for totally indulging my love of hex tiles.  I was able to drool all over them and narrow down my choice to the 1" and 2" mosaics, seen above. 

So with all of that inspiration in mind, it was time to get to business.  I was ready to show that old hearth who is boss!!


***Although I was super, duper lucky to get some free tile and materials for this project from The Tile Shop, this is not a sponsored post.  I've always promised to keep it real with you guys, so I wanted to let you guys know how much they rock! :)***

Monday, May 20, 2013

Sew in Love.

After I finished up a friend's curtain panels, I was on a major sewing kick.  I had just purchased this beautiful citron-ish fabric a few weeks ago, and knew it'd tie perfectly into our house...it was just a matter of where I'd use it.


I decided a spring runner for the dining room table would be perfect and got to work.  I cut off a piece the fabric...making sure I left plenty of yardage for other projects.


Then I started pinning just like I did with the curtains {except I kept a smaller seam this time} and ran things through the sewing machine.


I'm a big fan of how the yellow pops against our dark wood dining table.  I'm just sewwww in love with it.  See what I did there?  Yup, I'm a nerd.


And don't forget to enter my very first giveaway with Modern Masters!!

Friday, May 17, 2013

Modern Masters Metallic Paint Review & {Giveaway}!!


One lucky day I was contacted by the sweet people at Modern Masters to review some of their products.  I could choose from their metallic paint collection or try out their metal effects kit.  You all know how much I love to paint everything {some examples here and here}, so reviewing a paint product was right up my alley!

I headed to their website, and was immediately impressed with the number of colors they offer.  I had quite the difficult time narrowing down which I wanted to try out, but after a great debate, I made my choices...and then stalked my mailbox until my package arrived. ;)

My thoughts then turned to what I wanted to try the paint on.  Luckily, I was in the middle of a project that could benefit from a little metallic paint.

We had a large wooden tray that needed a major makeover.  {Yes, I had already started sanding when this "before" was taken...whoops!}


I sanded and re-stained the piece because the undertones were a little too red for my liking, and the cup rings were not the prettiest thing to look at. 


Once that was dry, I tapped off {and aluminum foil-ed off} the areas of the tray I didn't want to get paint on.  Then I grabbed a couple different widths of stencil tape from my craft basket and started laying out patterns.  {And before you ask...nope, I didn't measure a thing.  I just eyeballed everything to make sure it appeared even.  One of my requirements for this design was that I did NOT want to have to measure a. single. thing.}


After all the tape was down, I used an exacto knife to cut away the pieces I didn't want.


Then I took my tray outside and gave it two coats of gold spray paint and primer {Rustoleum's Universal in Pure Gold...best gold spray paint out there...in my opinion, of course}.  I wanted the design to appear pretty opaque, and I wasn't sure how sheer the metallic paint would be.  So I figured, better to prime the surface and be safe, rather then sorry!


Once the spray paint dried, I pulled out the new paint...woohooooo!  {I used Brass - ME289.}


I placed a few small blobs of paint onto the tray and rolled 2-3 coats on, waiting only a few minutes in-between each of them.


Then I peeled back the tape to see things unfold...


It's amazing what a little metallic paint can do, huh?


And now for my honest opinion of this stuff....it rocks!!  I was hooked after the first coat of it went onto the tray.  The paint is incredibly easy to work with, the finish is beautiful and a little bit goes a long way with this stuff!!  In fact, I was so smitten with it after completing our tray, that I immediately started working on a couple wooden signs for some special blog ladies in my life...and thennn I used it on a couple gallery wall additions for our hallway!


Word even got out to a friend of mine that I loved the paint so much, that she graciously volunteered a table of hers to be made over with the Blackened Bronze - ME238 Shade. ;)  Keep a look-out for the reveal of that next week, and enter my very first giveway below!! :)  One super lucky reader will win their choice of either one quart and 6 oz. container of any color OR four 6 oz. containers of any color OR a metal effects kit {one pint primer, one pint reactive paint, one 4 oz. solution or rust activator, one spritzer cap, one pint of Permacoat Xtreme for rust only} from Modern Masters!! :) 

Good luck everyone!

**All opinions in this post are 100% mine...I'd never lie to my amazing readers!!**

Wednesday, May 15, 2013

DIY Curtains...For a Friend...That I Want to Keep.

Follow my blog with Bloglovin A sweet friend of my recently came to me with a dilemma.  She was working on overhauling her office, and could not find curtains for the space.  Things were either too expensive, or just weren't the look she was going for.  I could totally relate...the same thing happened to me every time I looked.  So I told her there was an easy solution...just buy fabric and make them!

She said great!  Buuuuut she didn't have a sewing machine, and she didn't know how to sew.  Welp, that could be a problem...except for the fact that I have one and knew how to {well learned to from my Mama}.  So we planned a date to fabric shop at a discount store near work, and she picked out a gorgeous orangey ikat fabric.  It's amazing...as in so amazing, I might need to go back and get myself a yard or two.

Anywho, once the fabric was bought, it was time to get down to business.

My friend was not going to use these for function {no opening and closing of the curtains to hide the window}.  Like those in our house {here, herehere and here}, she only needed them to dress up the space and add a pop of color.  This helps to keep the cost of fabric down, since you can usually just buy the yardage you need for one panel and cut it down the middle to make two.

So that's just what I did.  I sliced the fabric in two and lined things up making sure the fabric was running the same way. 


Then I started pinning... 


And sewing...


After some time, I was all done with both panels!


Well I use the word "done" loosely.  I didn't sew the bottom hem yet because I was waiting for her to hang her hardware so I knew how long to make the curtains.  Hopefully I can post a picture of them hanging in their new home soon! :)

Anyone else ever make a project for someone that you wanted to keep yourself?  Am I the only bad one? ;)